Art Projects

Thursday, January 29, 2015

Winter Mice


Look at these darling mice...


My first graders love to cut and paste and build.  So... I told them a true story about what inspired this lesson.  I opened Cedar Creek Elementary 18 years ago.  Our school's playground backs up to a wooded area with trees.  It's quite beautiful!  One cold winter, we found an infestation of mice in our building.  Most likely from the playground doors opening and closing all day long.  We had to cover all of our food.  No more leaving bananas on my desk to snack on.  So I developed this mouse project.  I asked my first graders to dress their mouse warmly (hats, boots, scarves, mittens) and make sure it had something to eat so it would stay outside.  I got cheese, cookies, cupcakes, ice cream cones...you get the idea!

So here is the basic mouse....  I gave each student
1 - 6 x 9 gray
1- 4.5 x 6 gray
1- 3 x 6 gray
And we drew raindrop shapes for the head and body, making sure that all sides of the raindrop touched the edges of the paper.  We folded the last piece in half and cut a circle for the ears.


I showed the students how these pieces could be moved and arranged to show different viewpoints of the mouse.  He could be looking at you, it could be a side view, etc.


Once these basic shapes were cut out, they went to town cutting and gluing all the details.  It took them two 40 minute class sessions.  I use elmer's glue the first day, then glue stick the second, as they outline all the cut pieces with black marker.  Make sure to give your mouse a furry texture with tiny lines.  And, don't forget the whiskers!  We finished the backgrounds in crayon.  


Wednesday, January 28, 2015

Designing Symmetrical Hearts

Fourth graders chose a colored piece of 12 x 18 construction paper, folded it in half and sketched a large half heart on the fold.  After cutting them out, they used crayons and construction paper crayons (these work awesome on dark colored paper) to create a design on half of the heart.  Then they folded it in half and used the end of a ruler to "rub" the wax onto the other side of the heart.  This transfer process is a bit more difficult and after the initial whining...they all got their designs transferred to the other side.  A tip:  Use your thumb and stand up to create more pressure to transfer the wax.


You will see a light version of the design, but enough to retrace it and make it symmetrical.


These were mounted on a background paper.  Some chose black for contrast, and some chose a color in their design.  Once glued we used detail brushes to paint white tempera paint in small areas to make the colors "pop".  I showed them how the end of a paintbrush makes perfect dots and putting the dots close together creates a beautiful detailed line.  Here are some of the results.


Monday, January 26, 2015

Portraits

I try to paint as much as time allows me, and these have been in the works over the past year.  My grand-daughter, and some self portraits.  When I feel like all I am doing are elementary examples, I try to do some "grown up" art and paint at home.  Painting makes me feel good!  It heals my heart, mind, body and soul, AND, more importantly, it makes me a better art teacher!  I'm getting better at not judging myself or my work... the VERY reason I don't think we should grade elementary art!  Just my humble opinion.


Haring Kids

This lesson is new for me and I was inspired by one of the other art teachers in our district when she was sharing.  We looked at my power point on Keith Haring and used his figures as inspiration for these cool paintings.  We began by painting the backgrounds any way students wanted.  I used Crayola's educational watercolors because they contain 24 pans of color and are much brighter than regular watercolors.


The second session we spent painting figures.  We struck some "poses" in class, then took some time sketching at least 3 different poses.  Once they got the one they liked, they painted them on their painted papers.  They chose one stamp and used the same color paint to create more interest in the background.


We weren't finished yet!  We spent a third class session outlining the figures with oil pastels.  They had to choose a color that would make the figure stand out.  Then, they used more oil pastels and many colors to outline the background colors.  We finished by adding 3 lines of glitter somewhere on the figures.  The layers just look gorgeous!


Clay Roses

It's that time of year again.....Yup, Valentine's Day!  Fourth graders used clay to sculpt their roses.  We started out with a cone shape and used a pencil to open the tip for the rose bud center.  We then proceeded to pinch out thin petal shapes and attach them around the bud, putting 3 petals around the center, then alternating more petals.  Welding the clay works well for this type of sculpting.  Welding is a way to attach wet clay to more wet clay by smoothing it together.


Next they are off to dry.


Once fired at cone 04, they become pure white.  We use acrylic paint to add color and a liquid glaze with glitter for a little sparkle.


Friday, January 23, 2015

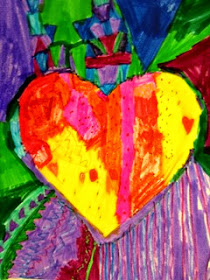
Dine Hearts

Lots of teachers use Jim Dine and his simplistic series of the heart shape.  I took the opportunity to teach my 3rd graders about analogous colors and painting loosely with this lesson.  We used the Crayola SO BIG brushes and I told them I wanted to "see" the brushstrokes.  After viewing a powerpoint on this American artist, I gave a demo and here is what my little people saw.

1.  Begin by picking a set of analogous colors.  These lie next to each other on the color wheel and blend beautifully to create an intermediate color.  White was also used, so they got 3 colors on their paper palette.  White will lighten any color, so you see, the paintings had many colors in them.  I showed my students how to mix on my paper, and not on the palette.  Another point is to tell students not to over-mix!  If they get something they like, leave it alone.  Use loose, big brush strokes.  I showed them how to dry-brush (using just a little paint on the brush which makes a soft look.)  I showed them stippling (bouncing the brush up and down and dabbing paint on).  I showed them big sweeping motions with my arm and brush.  You could hear the oohs and ahhs while I gave my 6 minute demo.

2.  Then off they went to paint.   They were to fill their entire paper.  Here is what they look like after the painting.


3.  The second class session we used oil pastels to layer on more details.  I showed them how to add a shadow with black and asked them to use the paint to guide them in adding more details.  Whatever they decided to do, they needed to REPEAT to create a unifying design.  This was an opportunity to talk about contrasting colors and complementary colors (colors opposite each other on the color wheel) and why artists use them.

I got some pretty amazing paintings!  Take a look!


Love Bunnies

"Kindies" (I call the kindergarten this) spent a class session using a sponge and learning about "stippling".  After passing out sponges, white paint, and a paint palette (I use recycled half sheets of copy paper whenever we paint with less than 3 colors, because they can just throw them away when done and NO clean up!) we began stippling our rabbits on pink paper.   I did it step by step with them in this order...

1.  In the middle of the paper stipple an oval for the head.
2.  Connect the head to a larger oval for the body.
3.  Add the legs and front paws.
4.  Stipple the ears.  I showed them floppy ears as well as straight ears.

The second class session, we used a black marker to illustrate the details.  Small lines created the furry texture, and each student created there own face.  Don't forget the whiskers!  We used markers to add the hearts and I told them to be creative in how they added them to their painting.  You could use any media, oil pastels, more paint, glitter....you get the idea.

These turned out SO adorable!


Flowers from the Heart

My first graders loved this lesson.  It took two 40 minute class periods. Here's how we did it....

1.  Each chose a stamp and with a marker, stamped around the edge of the paper, staying as close to the edge as possible and keeping the stamp shapes close as well.  ( I made my own stamps years ago using foam and gluing the foam to a small square block of wood.  I got 4 stamps on each block.)  I have had these forever, and this gives them a choice when they get a stamp block.
2.  Then they chose two other colors of markers and followed around the stamp as closely as possible, letting the edge of the stamp dictate the path of the line.  They used a total of three colors to enhance the frame.
3.  Using black sharpie they drew and designed three hearts at the top of their paper, then drew stems and leaves.  I left the colors up to them.  These little people LOVE designing!

Check out some of their work!


Wednesday, January 21, 2015

Warm Hearts

Kindergartners loved designing these hearts!  It was a great chance to teach warm and cool colors, and a fantastic lesson in "filling the space".  We used markers (which they rarely get to use in the classroom).  Some are natural designers, and some kiddos got some pretty cool effects with the markers.  Take a look....