Showing posts with label Grade 5. Show all posts

Wednesday, September 16, 2015

Owls

All of my K-6 students worked on owls this week using different mediums and focusing on different media and/or concepts.  Take a look at what my kiddos have been learning.....

GRADE 6:  We focused on REALISM.  I gave my students photographs of owls and they chose one to draw in pencil.  We talked about how to create the feathers using hatching and cross hatching with a black sharpie.  We used vine charcoal to create the gray values.  Drawing is just "seeing" and I encouraged them to really look at the lines and shapes in the photographs.  They were amazed at what they actually could see and record!


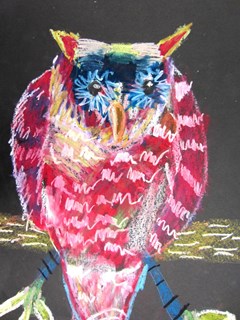
GRADE 5:  Here we talked about the concept of STYLIZING.  An image that is stylized looks like the object (an owl), but is designed using interesting ideas with shapes and lines.  We drew the contour of the owl and designed the interior of the owl.  Watercolor pencils were used over the black sharpie work, and a little water gave these that "painterly" look!


GRADE 4:  These owls were done on black paper with oil pastels.  Our focus with this lesson was layering the colors and VISUAL TEXTURE.  I challenged them to use lines to create the "feathery" look on the owl.  The layering off the oil pastels produces such a rich, yummy color!


GRADE 3:  We drew simple owls and used a texture plate in the background to create the cool patterns.  We used the educational watercolors which has 18 beautiful colors to choose from.  The colors in these were student's choice.


GRADE 2:  We used some of the painted papers we did on the first day of school for these backgrounds and students drew and cut out there owls, branches and leaves.  This mixed media project ended with a paint treatment using the end of a brush to create the white dots.


GRADE 1:  Letter Owls!  Again, we used some of the fun painted papers we made and used the letter U to make the owls body.  The letter B was for the eyes, the letter D for the wings, and the letter O for the whites of the eyes.  We used black marker to outline and construction paper crayons for the color on our dark backgrounds.  Cutting and gluing was a skill we practiced on these collages.  Collage is a french word which means to "paste".  Cute, cute, cute!!


GRADE K:  These owls were done as a directed drawing.  I asked my kindies to look and "see" all the shapes and lines that were used to build this drawing.  They did an amazing job of "seeing"!  We also worked on filling the entire page with color and I showed them how to do a little blending with colors.  They loved using the texture plates in the background!


Wednesday, September 2, 2015

Lines Everywhere!

Students in grades 3-4-5 created these beginning of the year line projects.  Grade 3:  We personalized the work by using our own hands as inspiration.


The 4th graders chose a letter and they created beautiful line designs in the background.


And my 5th graders stacked words that described them, hobbies or their name and created gorgeous backgrounds with black sharpie.


Thursday, August 20, 2015

Painted Papers

As I begin my 37th year teaching ART, I realize that this love I have of students and art is really the only life I have every known!  Each year I stretch myself by trying new projects, and new ways to inspire kiddos!  I feel like I have grown tremendously in the last 37 years!  I was fortunate enough to hear an inspiring message by our Teacher of the Year, and it really put things in perspective for me. She told us to not forget about taking care of ourselves!  We need to put ourselves first so we can be there for students.  She also said what most of us already know, but usually forget.... and that is.... kids don't remember how your room is decorated or the posters you have up.  They remember YOU.  That got me thinking about my favorite teachers and why I like them SO  much.  It was because they made a personal connection with me!    Teaching over 550 students makes that a daunting challenge to say the least!  But my goal is to get to know my students through their art and art experiences!  Making art that is personal to them is my vision for all students!  With that said, on with the planning of art lessons!

The first thing we did this year grades 1-6 was to spend a day painting papers!  What fun!!  We will have a great stash for projects this year.  I even pulled some of the papers back out to layer more paint on with the next class.


Monday, April 20, 2015

Molas

I have this wonderful mola in my classroom that I show students before we began this lesson.  I got it for $1 at a garage sale.  I don't think they really knew what it was, or the value of it.  I told students that the layers of colored fabric were all hand stitched by the Kuna Indians of the San Blas Islands off Panama.  We viewed a quick video which I found on you tube.  This is the one we watched; you can see it HERE.

Here is the beautiful mola in my art room.


Here are the steps for creating these molas.

Materials
9 x 12 black paper
9 x 12 white paper
markers/glue/scissors
Crayola woodless colored pencils (you could use any medium for the background)
embroidery thread/needles/needle threader/tape

1.  On the white 9 x 12 paper draw an image for your mola.  We viewed and talked about the images the Kuna Indians used, which come mostly from nature.  I let students pick any image they wanted for their molas and I got some interesting ideas.  Animals, flowers, small creatures, monsters, etc.
2.  Once drawn in pencil, students used markers to create the layers of color.
3.  These were then cut out and glued to the black paper.
4.  We used Crayola woodless colored pencils to add a repetitive background.
5.  I showed students a simple running stitch to stitch around the image.  This gave them an idea of how long it would have taken for a mola to be created.  I used a needle threader as students were not very good at threading.  I also showed them how to pre-punch their holes into the black paper so the stitching would be more even.  They really enjoyed the sewing part....even the boys!  Here is one student threading her needle.


And....here are some finished molas by my 5th graders.


Friday, March 13, 2015

Borbz

I ran across Rita Nikolajeva, a Belgium tangle artist on Pinterest.  She is amazing and makes up her own zentangles and gives them fun names.  You can see her work HERE.

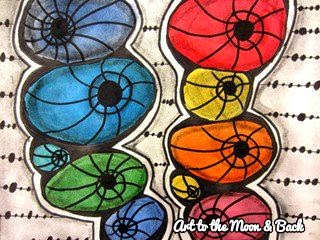
A BORB is a squished orb with a border.  Her work is in black and white and here was my first attempt at it.  I used curved lines instead of straight lines on the orbs and shaded to create more depth. I cut these out and glued them to black paper.


Then I thought it would be cool to add color to these fun shapes.  In these examples I painted the orbs in the bright educational Crayola watercolors before adding the black sharpie work in both fine and extra fine.  I used the extra fine for my patterns in the background.  I used vine charcoal to add the shading.


I was satisfied with these and began the lesson with my 5th graders focusing on creating depth with the curved lines and shading.  Here are some of my students getting started and adding their details.


They loved the process of creating these colorful BORBZ!
Check out the finished work!


Here are the steps to create these:

1.  Draw two rows of flattened ovals (orbs) stacked one on top of the other.
2.  Create a double lined border around each stack.  Leaving the white edge helps with contrast.
3.  Add a hole with a border and attach curved lines going in any direction.
4.  Paint the orbs.
5.  Sharpie all pencil lines with a fine point sharpie.
6.  Add a background with an extra fine point sharpie.
7.  Use vine charcoal to shade each orb and hole, as well as the edges of the stacks.

There are all kinds of variations with this!  Have fun!!